This article will help you understand the basics of ALE and IDocs via a simple do-it-yourself example. We will create a custom IDoc in one SAP system and then post some business data through it to another SAP system. Business data will be picked up from custom data dictionary tables.
ALE – Application Link Enabling is a mechanism by which SAP systems communicate with each other and with non-SAP EDI subsystems. Thus it helps integration of distributed systems. It supports fail-safe delivery which implies that sender system does not have to worry about message not reaching the source due to unavoidable situations. ALE can be used for migration and maintenance of master data as well as for exchanging transactional data.
The messages that are exchanged are in the form of IDocs or Intermediate Documents. IDocs act like a container or envelope for the application data. An IDOC is created as a result of execution of an Outbound ALE. In an Inbound ALE an IDOC serves as an input to create application document. In the SAP system IDocs are stored in the database tables. They can be used for SAP to SAP and SAP to non-SAP process communication as long as the participating processes can understand the syntax and semantics of the data. Complete documentation on IDOC is obtained by using transaction WE60.
Every IDoc has exactly one control record along with a number of data records and status records. Control record has the details of sender/receiver and other control information. Data records contain the actual business data to be exchanged while the status records are attached to IDoc throughout the process as the IDoc moves from one step to other.
Now, let us understand the ALE Configuration by means of an example scenario below:
The Scenario
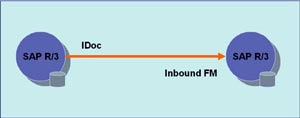
 Data from custom tables (created in customer namespace) is to be formatted into an IDoc and sent from one SAP R/3 system to another using ALE service. We need to have two instances of SAP R/3 systems or we can simulate this on two clients of the same SAP R/3 system.
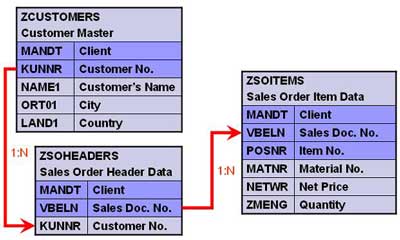
Create three tables as shown below.

Creating Custom IDoc type and Message type
All the objects created should be present on both source as well as target system(s).
1. Create segments – Transaction WE31
- Create a segment ZRZSEG1
- Add all fields of table ZCUSTOMERS to it
- Save the segment and go back
- Release it using the menu path Edit -> Set Release
- Similarly create two more segments given below
- Seg. ZRZSEG2 – to hold all fields of table ZSOHEADERS
- Seg. ZRZSEG3 – to hold all fields of table ZSOITEMS
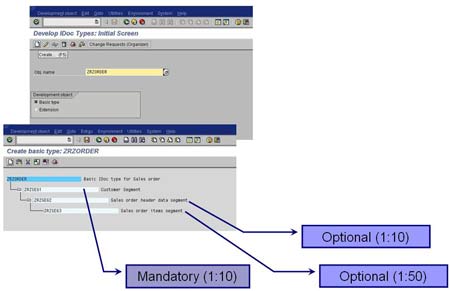
2. Create Basic IDoc type – Transaction WE30
- Create a Basic type ZRZORDER
- Add the created segments in the hierarchy shown
- Maintain attributes for each of the segments
- Save the object and go back
- Release the object using the menu path Edit -> Set Release
3. Create/Assign Message type – Transactions WE81/WE82
- Go to WE81
- Create a new Message type ZRZSO_MT
- Save the object
- Go to WE82 and create new entry
- Assign the message type ZRZSO_MT to the basic type ZRZORDER
- Also specify the Release Version
- Save the object
Thus we have defined the IDoc structure which will hold the data to be transferred. In the next part of the article we will understand the outbound settings, i.e. the settings to be done in the source system.