In previous article, we discussed IR Settings needed for your first XI scenario. Now, let us delve into ID Configuration. Integration Directory is a configuration tool which helps to configure the routing rules for the business scenarios created in Integration Repository. The ID binds the technical routing information to the interfaces via the communication channels. Communication channels contain the adapters which do the job of translating incoming message to XML and vice versa in case of outgoing message. There are different types of adapters like File, IDoc, RFC, JDBC, JMS, Mail, SOAP, HTTP etc. There are many Third-Party adapters provided by Third-Party Vendors like Seeburger, RosettaNet etc. Note that incoming message (i.e message from the sender system) is referred to as outbound message while outgoing message(i.e message being delivered to the target system by XI) is referred to as inbound message. The frame of reference is always the communicating systems and never the XI box or the integration system. Now, let us start with Directory Configuration.
Define Collaboration Profiles
Collaboration Profiles contain the information about involved parties, business systems/services, and the communication channels.

- Access path – Start Integration Builder (SXMB_IFR) -> Integration Directory
- Create a new scenario object and save it
- Expand the above created object
- Choose ‘Service Without Party’
- Right-click on ‘Business System’ and choose ‘Assign Business System…’
- In the wizard, leave the Party name blank, select your BS and uncheck the box ‘Create Communication Channels Automatically’
- Expand your service (BS), right-click on ‘Communication Channel’ and select ‘New…’
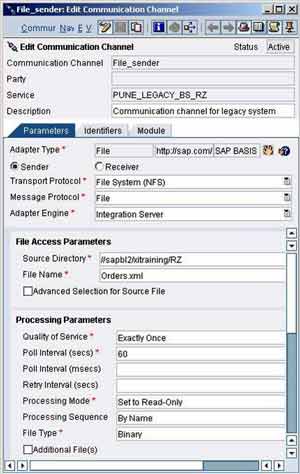
- Name the communication channel as ‘File_sender’
- Choose adapter type as ‘File’ and option as ‘Sender’
- Specify the transport protocol, message protocol, adapter engine as shown
- Also specify the File Access Parameters and Processing Parameters as shown
- Sender file adapter is now configured
- Save the communication channel
- Similarly, create receiver communication channel ‘IDoc_Receiver’ with adapter type as ‘IDoc’, option as ‘Receiver’, Transport and Message Protocol as ‘IDoc’. You will also need to specify Adapter Engine, RFC Destination, Interface Version, Port and SAP Release. RFC destination must be defined in SM59 to point to the target SAP R/3 system, likewise port should defined using transaction IDX1.
Define Logical Routing
Logical Routing Objects contain Receiver Determination and Interface Determination. Receiver Determination determines one or more receivers for a particular combination of sender and outbound interface. Interface Determination determines which interface should be used for inbound message processing.
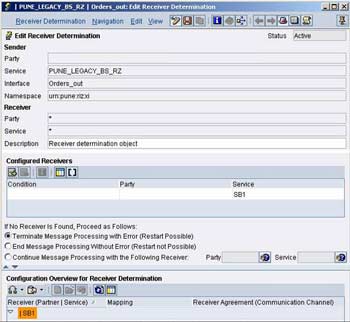
- From the left frame create a new ‘Receiver Determination’ object
- Select your sender service and interface
- In the ‘Configured Receivers’ section, choose the receiver service (BS for the R/3 System)
- Save the object
- In the section ‘Configuration Overview for Receiver Determination’ in Receiver Determination screen, hit ‘Refresh’
- In the column ‘Receiver (Partner/Service), right-click and select ‘New Specific’ in order to create a new interface determination object
- Select your interface ZRZSO_MT.ZRZORDER
- Select your interface mapping Orders_out_ZRZORDERS
- Save the object
Define Collaboration Agreements
Collaboration Agreement consists of Sender Agreement and Receiver Agreement. The Receiver Agreement defines a binding between the receiver communication channel and the inbound interface while the Sender Agreement defines a binding between the sender communication channel and the outbound interface. Let us create a Receiver Agreement.
- In the section ‘Configuration Overview for Receiver Determination’ in Receiver Determination screen, hit ‘Refresh’
- In the column ‘Receiver Agreement (Communication Channel)’, right-click and select ‘New Specific’
- Specify the Receiver Communication Channel as ‘IDoc_Receiver’
- Save the agreement
- Go back to the receiver determination screen and hit ‘Refresh’
Now, create a Sender Agreement,
- In the left frame, right-click on ‘Sender Agreement’ and select ‘New…’
- Select your service
- Select your outbound interface (Orders_out)
- Choose the sender communication channel (File_sender)
- Save the agreement and close
Now go to the Change List tab in the left-frame and activate your change lists. This completes our Directory Configuration. In the next blog post we will understand what settings are required in the receiving R/3 partner system and how to test the scenario.