Building web transactions in ITS is difficult not because of the complexity of the technology, but just because of no proper material available any where to learn this subject. The purpose of this article is to provide the basic idea and framework on ITS development for the people who want to excel in this field. This is particularly useful for the people who are working in SRM – EBP module. This article is part of series of developments which are done in the SRM sandbox. This is the first article in this series, where development of a web transaction has been explained in detail.
The web transaction development involves two parts.
- Creation of a module pool program and assignment of web easy transaction to it
- Creation of Internet service and HTML template for each screen involved in the module pool program.
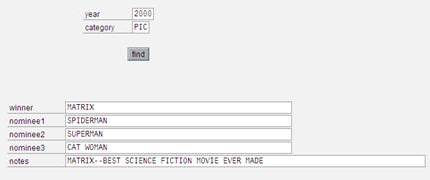
A module pool program with the name ZYMOVIE1 has been created in SRM sandbox. The program has one screen (Screen 9000) as shown below.

The screen contains two I/O fields called YEAR and CATEGORY. The push button FIND triggers the PAI of the screen and the results are displayed on the same screen. A table with name YMOVIE1 has been created for this purpose. The table contains the data about the nominees and winners in a certain category for a particular year.
The program is as follows:
*&---------------------------------------------------------------------*
*& Module Pool ZYMOVIE1
*&
*&---------------------------------------------------------------------*
*&
*&
*&---------------------------------------------------------------------*
INCLUDE ZYMOVIE1TOP . " global Data
* INCLUDE ZYMOVIE1O01 . " PBO-Modules
* INCLUDE ZYMOVIE1I01 . " PAI-Modules
* INCLUDE ZYMOVIE1F01 . " FORM-Routines
tables : ymovie.
DATA: OKCODE like sy-ucomm.
tables: ztext.
*& Module GET_RECORD INPUT
*&---------------------------------------------------------------------*
* text
*----------------------------------------------------------------------*
MODULE GET_RECORD INPUT.
case okcode.
when 'FIND'.
SELECT SINGLE * FROM YMOVIE
WHERE YYEAR = YMOVIE-YYEAR
AND CATEGORY = YMOVIE-CATEGORY.
endcase.
ENDMODULE. " GET_RECORD INPUT
An Internet service ZYMOVIE1 has been created and also a template for screen 9000.
After preparing the module pool we need to assign a transaction code for this. When transaction is assigned we should choose the “web easy transaction “option.
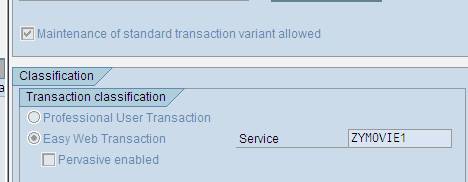
In the service fields enter a name for the service. If the service is not created, it will ask for creation and create the service.
After creating the service, you need to create the HTML template for the screen 9000. This can be done in two ways.
First method
Go into the screen layout and follow the path utilities→ Internet service template→ create.
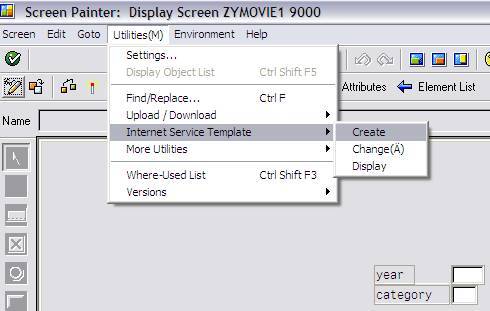
This will generate an HTML template for the screen. But the problem with this is SAP uses some standard HTMLB functions and style sheets to display the screen in the web. If you want to change the look and feel of the web page it is very difficult
Second Method:
In the second method we will write our own HTML code and change the look and feel of the screen as we want. This requires knowledge of HTML, JavaScript and HTMLB.
The HTML code is as follows:
<html>
<head>
`include(~service="bbpglobal", ~name="bbpfunctions.html")`
`SRM_Stylesheet()`
`include (~service="bbpglobal", ~name="WpIntegration.html" )`
`bbpformname = "BBPForm"`
<title>`~windowtitle`</title>
<!-- --------------INCLUDING SCRIPT... ---------------------- -->
<script language=JavaScript src="`mimeURL(~service="bbpglobal", ~language="", ~name="script/bbpscript.js")`">
</script>
<!-- -------------------------------------------------------- -->
</head>
<body>
`Background()`
`ApplicationTitle(title.value=TEST)` <BR>
`~messageline`
<form name="BBPForm" method="post" action="`wgateURL()`">
<input type="hidden" name="~OKCode" value="FIND">
<INPUT TYPE="submit" name="FIND" value="FIND">
`BBPTabBodyBegin()`
`BBPBoxBegin()`
`Table(class="format")`
`TR()`
`TD(class="label")`<label for="`YMOVIE-YYEAR.name`"> `YMOVIE-YYEAR.label`</label>
`if (YMOVIE-YYEAR.disabled)`
`TD(YMOVIE-YYEAR.value, class="data", active="")`
`else`
`TD(class="data")` <input type=text id="`YMOVIE-YYEAR.name`" name="`YMOVIE-YYEAR.name`" value="`YMOVIE-YYEAR.value`" maxlength="04" size="04" >
`end`
`TR()`
`TD(class="label")`<label for="`YMOVIE-CATEGORY.name`"> `YMOVIE-CATEGORY.label`</label>
`if (YMOVIE-CATEGORY.disabled)`
`TD(YMOVIE-CATEGORY.value, class="data", active="")`
`else`
`TD(class="data")` <input type=text id="`YMOVIE-CATEGORY.name`" name="`YMOVIE-CATEGORY.name`" value="`YMOVIE-CATEGORY.value`" maxlength="04" size="04">
`end`
`endTable()`
`BBPBoxEnd()`
`BBPTabBodyEnd()`
<p>
`YMOVIE-WINNER.label`
<input type=text name="`YMOVIE-WINNER.name`" value="`YMOVIE-WINNER.value`" maxlength="050" size="050">`assert(YMOVIE-WINNER.name)`
<p>
`YMOVIE-NOMINEE1.label`
<input type=text name="`YMOVIE-NOMINEE1.name`" value="`YMOVIE-NOMINEE1.value`" maxlength="050" size="050">`assert(YMOVIE-NOMINEE1.name)`
<p>
`YMOVIE-NOMINEE2.label`
<input type=text name="`YMOVIE-NOMINEE2.name`" value="`YMOVIE-NOMINEE2.value`" maxlength="050" size="050">`assert(YMOVIE-NOMINEE2.name)`
<p>
`YMOVIE-NOMINEE3.label`
<input type=text name="`YMOVIE-NOMINEE3.name`" value="`YMOVIE-NOMINEE3.value`" maxlength="050" size="050">`assert(YMOVIE-NOMINEE3.name)`
</form>
</body>
</html>
After writing the above code save the template and publish the entire service to “INTERNAL” site.
Before accessing the transaction through web there is a little bit of configuration that needs to be done in transaction SICF. This configuration is must for all the Internet Services. This has been explained in the references section in detail.
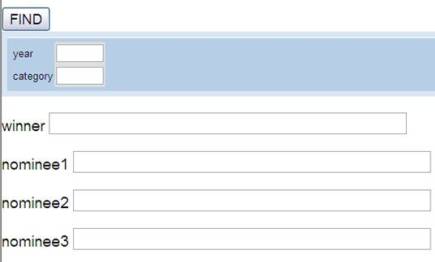
The present transaction looks as shown below when you access it through web (The URL is provided in the “References” section)
Let us now dig into the HTML code:
These below lines included in the section of the HTML page are necessary for any template as we need to include the templates bbpfunctions , Wpintegration and bbpscript.js. These files contain the standard HTMLB functions which we later use in the template.
`include(~service="bbpglobal", ~name="bbpfunctions.html")`
`SRM_Stylesheet()`
`include (~service="bbpglobal", ~name="WpIntegration.html" )`
`bbpformname = "BBPForm"`
<title>`~windowtitle`</title>
<!-- --------------INCLUDING SCRIPT... --------------------- -->
<script language=JavaScript src="`mimeURL(~service="bbpglobal", ~language="", ~name="script/bbpscript.js")`">
</script>
<!-- ------------------------------------------------------- -->
</head>
Coming to the <body> section of the template
<form name="BBPForm" method="post" action="`wgateURL()`">
<input type="hidden" name="~OKCode" value="FIND">
<INPUT TYPE="submit" name="FIND" value="FIND">
We need to use <form> tag to build the forms (which include the fields on the screen 9000). The value of “submit” type should always be same as the name of the push button you give in the screen (In this case it is “FIND”). This way ITS identifies which function code should be triggered in the screen, when you click on some button in the web.
Coming to the next part, BBPTABBodyBegin is a SAP provided HTMLB function also the function bbpboxbegin. If you see the Table tag it is almost similar to the <table> tag in normal HTML. The difference is the look and feel (see the blue colored box in the above screen. This is because of including the standard functions).
Also please observe the <input> tag. The id, name and value attribute how they are assigned to each element in the screen. Including the screen field names in ” ` —- ` ” symbol tells the ITS which screen field it has to deal with.
`BBPTabBodyBegin()`
`BBPBoxBegin()`
`Table(class="format")`
`TR()``TD(class="label")`<label for="`YMOVIE-YYEAR.name`"> `YMOVIE-YYEAR.label`</label>
`if (YMOVIE-YYEAR.disabled)`
`TD(YMOVIE-YYEAR.value, class="data", active="")`
`else`
`TD(class="data")` <input type=text id="`YMOVIE-YYEAR.name`" name="`YMOVIE-YYEAR.name`" value="`YMOVIE-YYEAR.value`" maxlength="04" size="04" >
`end`
`TR()``TD(class="label")`<label for="`YMOVIE-CATEGORY.name`"> `YMOVIE-CATEGORY.label`</label>
`if (YMOVIE-CATEGORY.disabled)`
`TD(YMOVIE-CATEGORY.value, class="data", active="")`
`else`
`TD(class="data")` <input type=text id="`YMOVIE-CATEGORY.name`" name="`YMOVIE-CATEGORY.name`" value="`YMOVIE-CATEGORY.value`" maxlength="04" size="04">
`end``endTable()`
`BBPBoxEnd()`
`BBPTabBodyEnd()`
Configuration in SICF
After creating the internet service go to transaction SICF and follow the below explained steps:
- Click on “Execute” button
- Follow the path ” default_host → sap →bc →gui→sap→its
- Select the ITS and right click. In the options select ” New sub element”
- Enter a name for service element
- The system will take you to the below shown screen
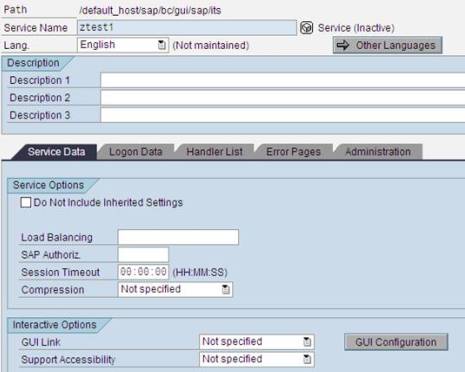
Enter the description for the service
In “GUI Link” drop down select “Yes”
Click on “GUI configuration “button and enter the below shown details

In the ~TRANSACTION parameter, transaction name needs to be entered.
After this click on “Handler List” tab and fill the details as shown below

Click on “SAVE” button and come back to the SICF transaction.
Right click on the new sub element that has been created and select the option “Activate service”.
To access this service from the web, right click on the sub element and select “Test service” option. This will open up the browser and display the transaction.
Useful links:
- For learning HTML and Javascript, the best starting point would be w3schools.com
- For learning HTMLB, I haven’t found anything better than this link
Sankar Rao Bhatta is an SAP NetWeaver Consultant with Intel, India. After completing M.Tech from IIT Bombay, he worked with IBM as SAP Consultant before joining Intel. Other areas of his expertise include SAP SRM and ABAP.