In the first part, we created a webdynpro application which consists of one window and one view. In this part of the series, we will concentrate on how to build an application having more than one view and achieve the navigation between different views.
Before going into the details of the development let us first understand some of the concepts used in creating the navigation.
Navigation between different views is enabled by plugs. These can be divided into inbound and outbound plugs. While inbound plugs define the possible starting points of a view, the outbound plugs of a view can be used to call a subsequent view. Plugs are part of the controller of a view. They are always assigned to exactly one view.
To navigate from one view to another, each outbound plug from the first view must be linked with an inbound plug of the second view with the help of a navigation link.
Note: A view can have multiple inbound and outbound plugs.
In technical terms creation of each inbound plus for a view creates an eventhandler method, so that the entering of a view using an inbound plug always causes an event handler method to be called
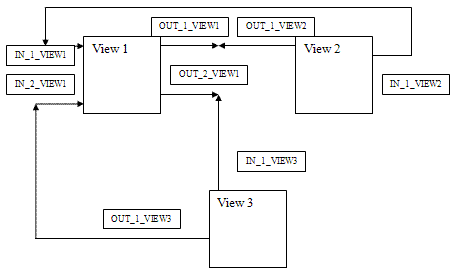
Now coming to the development, the below schematic diagram depicts the navigation between different views in the application.

The application will have one window MAIN and three views VIEW1, VIEW2 and VIEW3. The view1 will have two inbound plugs ( in_1_view1 and in_2_view1 ) and two outbound plugs ( out_1_view1 and out_2_view1 ).
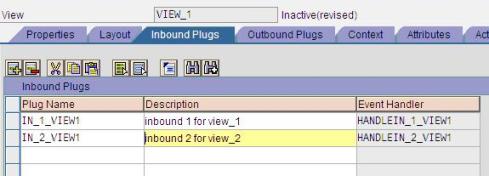
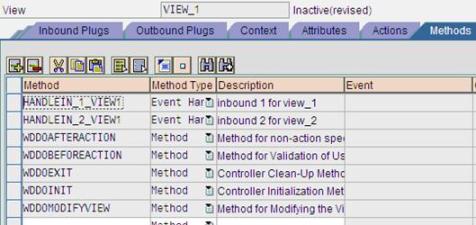
As soon as we create an inbound plug an event handler method with the name HANDLE will be created in the methods tab of the view.
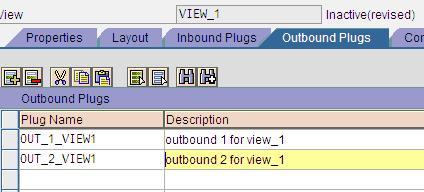
Similarly the views view2 and view3 have one inbound and one outbound plug each. After the creation of all the plugs, we need to embed the views in the MAIN window.

In the subsequent window select the view to be embedded by choosing F4. In the similar way add view2 and view3 also.
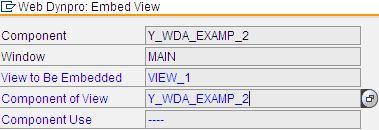
After embedding all the views, the window looks something as shown below
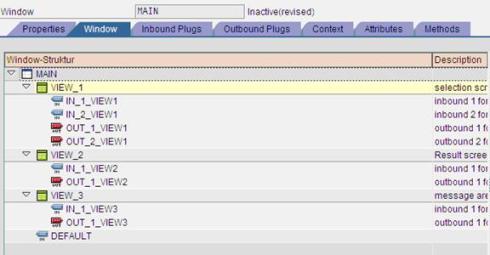
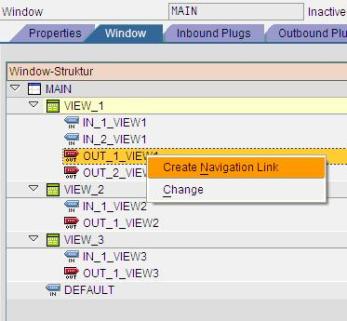
Now we need to create the navigation links between the inbound and outbound plugs. To create a navigation link right click on the outbound plug of view1 and select “create navigation link”
In the subsequent window select the inbound plug of the view2
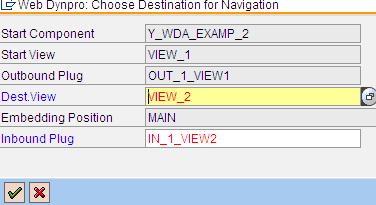
Similarly for the second outbound plug of the view1 assign the inbound plug of the view3. Also, connect the outbound plug of the view2 with the first inbound plug of the view1 and outbound plug of the view3 with the second inbound plug of view1.
After creating the navigation links for the plugs the window looks as shown below
Note: The symbol ![]() represents the navigation link between the inbound and outbound plugs.
represents the navigation link between the inbound and outbound plugs.
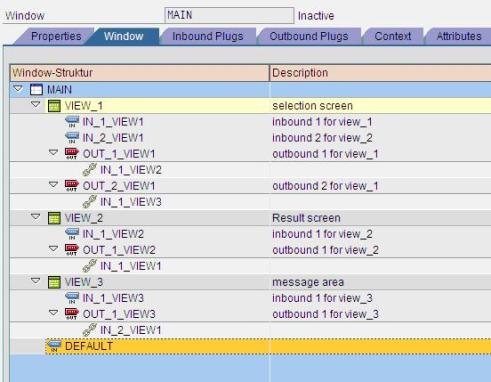
We will now move to the creation of the context for componentcontroller and view controllers. As the creation of the context nodes had been explained in detail in the first part of this series , it is not explained here in detail.
The component controller has two nodes MOVIE and SEL_OPT
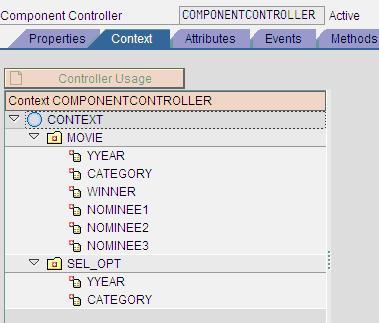
Controller of view1 contains two nodes MOVIE and SEL_OPT. These nodes are copied from the context of the componentcontroller using the wizard. The layout of the view1 is shown below
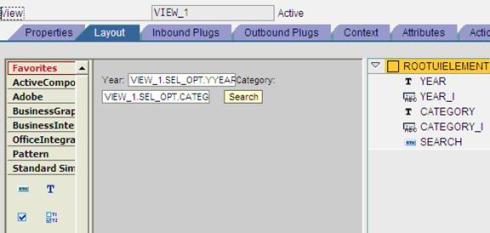
An event with the name onclick is assigned to the button “search”. The code for the corresponding eventhandler method is given below.
method ONACTIONONCLICK .
types: begin of movie_data,
yyear type ymovie-yyear,
category type ymovie-category,
winner type ymovie-winner,
nominee1 type ymovie-nominee1,
nominee2 type ymovie-nominee2,
nominee3 type ymovie-nominee3,
end of movie_data.
data: itab_movie type table of movie_data,
TABLE_NODE type ref to IF_WD_CONTEXT_NODE.
data:
Node_Sel_Opt type ref to If_Wd_Context_Node,
Elem_Sel_Opt type ref to If_Wd_Context_Element,
Stru_Sel_Opt type Wd_This->Element_Sel_Opt ,
Item_YYEAR like Stru_Sel_Opt-YYEAR.
* navigate from to via lead selection
Node_Sel_Opt = wd_Context->get_Child_Node( Name = wd_This->wdctx_Sel_Opt ).
* get element via lead selection
Elem_Sel_Opt = Node_Sel_Opt->get_Element( ).
* get single attribute
Elem_Sel_Opt->get_Attribute(
exporting
Name = `YYEAR`
importing
Value = Item_Yyear ).
data:
* Node_Sel_Opt type ref to If_Wd_Context_Node,
* Elem_Sel_Opt type ref to If_Wd_Context_Element,
* Stru_Sel_Opt type Wd_This->Element_Sel_Opt ,
Item_CATEGORY like Stru_Sel_Opt-CATEGORY.
* navigate from to via lead selection
Node_Sel_Opt = wd_Context->get_Child_Node( Name = wd_This->wdctx_Sel_Opt ).
* get element via lead selection
Elem_Sel_Opt = Node_Sel_Opt->get_Element( ).
* get single attribute
Elem_Sel_Opt->get_Attribute(
exporting
Name = `CATEGORY`
importing
Value = Item_Category ).
select * from ymovie into corresponding fields of table itab_movie
where yyear = Item_Yyear
and category = Item_Category.
if sy-subrc eq 0.
TABLE_NODE = WD_CONTEXT->GET_CHILD_NODE( 'MOVIE' ).
TABLE_NODE->BIND_ELEMENTS( itab_movie ).
wd_This->Fire_Out_1_View1_Plg(
).
else.
wd_This->Fire_Out_2_View1_Plg(
).
endif.
endmethod.
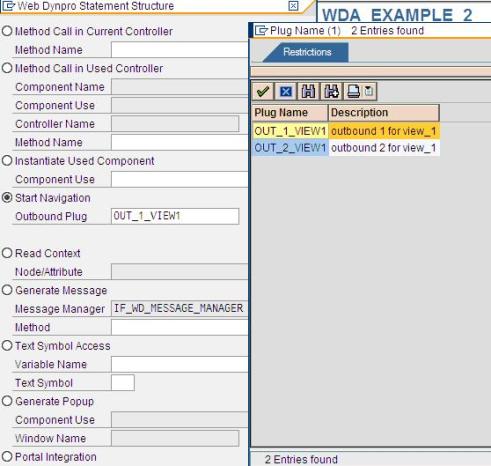
To generate the code (highlighted in blue color) which actually carries out the navigation between different views, we use the code wizard again as shown below.
The context of the view2 contains the MOVIE node copied from the context of the componentcontroller.
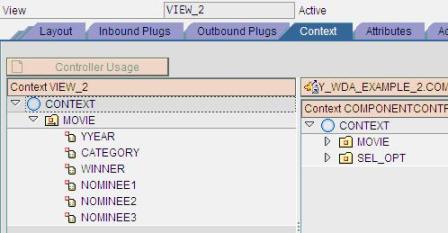
The layout of the view2 is shown below
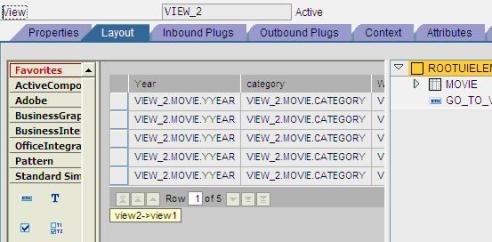
View2 has a button with the name “view2->view1” which will trigger the action view2_to_view1.
The final output in the web page looks like this:

The result screen for the 2006 year in PIC category is shown below:
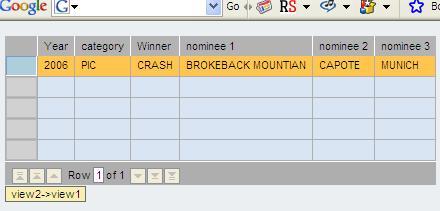
The button “view2->view1” takes you to the first screen.
If we enter the year and category combination, which does not exist in the table YMOVIE the message appears in the different screen and the navigation from this screen is achieved by the button “view3->view1”.
