The purpose of this article is to provide the basic idea and framework on Web Dynpro ABAP developments, for the people who want to excel in this field. This is particularly useful for the people who had working experience in ABAP OOPs and want to learn Web Dynpro ABAP.
This is the first article in this series, where extracting the data form a table has been explained in detail.
The development involves two steps.
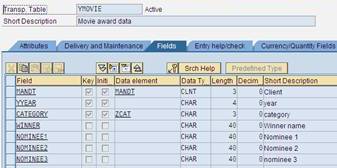
1) Creation of a table YMOVIE to store the data.
2) Developing a web dynpro application in order to extract the data form the table and display it in the browser.
I presume that the reader has good knowledge on ABAP data dictionary, so I will not go into the details of the table creation.
The table name is YMOVIE and has 7 fields, which are
- MANDT – client
- YYEAR – Year
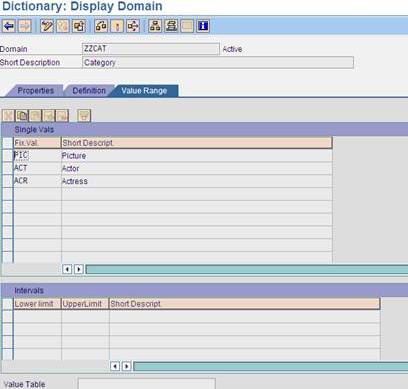
- CATEGORY – Category ( The domain for this field has fixed values PIC, ACT and ACR )
- WINNER – Winner
- NOMINEE1 – nominee 1
- NOMINEE2 – nominee 2
- NOMINEE3 – nominee 3
The table basically stores the oscar award data for different years and categories.

The domain ZZCAT is shown below:
Now coming to the second and important part of the development, the ABAP workbench ( SE80 ) is used to develop the web dynpro component / interface.

Enter the name of the web dynpro component and click on “Display” button. It will ask whether to create the new component or not. Click on yes and enter the description for the new webdynpro component.
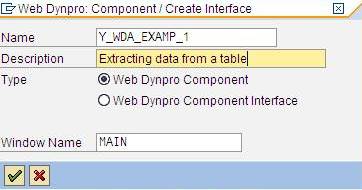
The window name by default is same as name of the web dynpro component, but you can change it ( In this example it was changed to MAIN ). Save the object as local object.
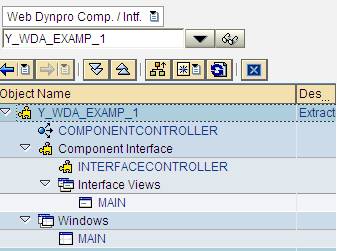
When you first create a component you will see that some things are automatically generated by the system. Let us discuss about them in detail.
Component Controller
The component controller is a central location for data exchange between different views of one component. Each Web Dynpro component contains exactly one component controller. This controller is automatically created during the component creation and contains a context, events, and methods. the controllers of different component views can access context elements or methods of the component controller.
The component controller has several tabs like context, attributes, methods and events etc.

The attribute WD_CONTEXT is a reference variable of type IF_WD_CONTEXT_NODE. This attribute technically refers to the root node of the context of the controller. There are several methods available in this interface, which are used to edit the data held by context nodes.
For example:
- GET_CHILD_NODE – this method retrieves a specific child node.
- GET_ATTRIBUTE – this method retrieves the value of a context attribute.
- BIND_TABLE – This method binds an internal table to a context node.
Each controller contains a local interface which can be accessed in the controller. The controller attribute WD_THIS is a reference to this local interface. The methods and attribute of the local controller interfaces can be accessed using these reference variables.
Component Interface
Each component has an interface in order to enable communication between Web Dynpro components and to enable a component to be called up by a user. This interface consists of two parts:
Interface View of a Window Contained in a Component
The interface view of a Web Dynpro window is used to link a window with a Web Dynpro application that can be called by the user. The interface view contains inbound and outbound plugs. When you create the component, system automatically creates a inbound plug with the name DEFAULT as a startup plug.
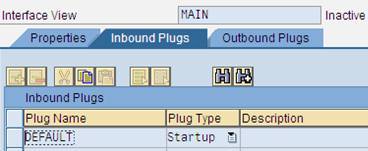
Interface Controller of a Component
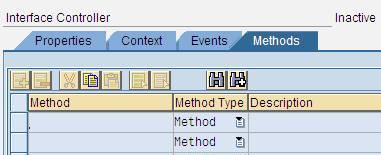
As well as the visual part, the interface of a Web Dynpro component also has a programmatic part, the interface controller. This is visible inside and outside of the component, and performs the program side of the exchange of business data. The interface controller, like the interface view, is not an independently implemented object. Instead, the visibility of methods and events of the component controller can be extended beyond the limitations of the component in question.
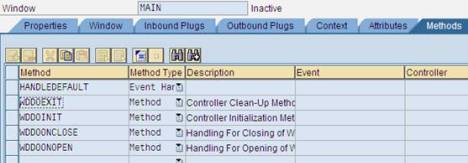
A window is used to combine several views. Each window has a uniquely assigned interface view. This interface view represents the outward view of the window. The interface view is linked with a Web Dynpro application so that the window can be called using a URL.
The window consists of several tabs like inbound and outbound plugs used for navigating between different windows and its own context, attributes and methods.
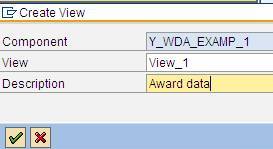
To create a view right click on the component and select create→view

Enter the name and description for the view.
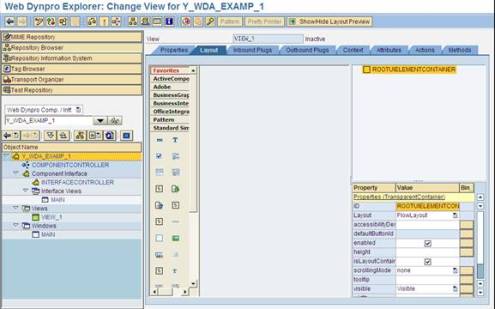
To create elements under the root node, right click and select “Insert element”.

In the drop down, there are several options like label, button, input field etc.
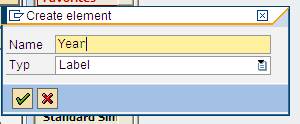
We will create two labels and two input fields for year and category . We will also create a button with the name search. A table which will display the results based on the year and category provided in the input fields.
In the property panel of the each element (button, label etc.,), the value entered in the “text” field appears as the label on the element.
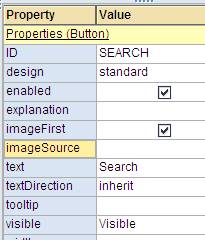
After the creation of all the above said elements the layout of the view looks something like this (observe the message in the table element “table does not contain visible columns”)
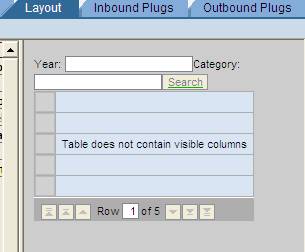
Till now we have designed the layout of the view, which is the user’s view in the browser. We did not link the fields with any elements of the context, neither we have written any application logic to fill the table with the data.
There are two types of context, one is context of the component and the other context of the view. The first one is global to the component and the elements in this context can be accessed from any of the view. On the other hand the view context is local to the view. We need to create and link the context elements for the two input fields and the table.
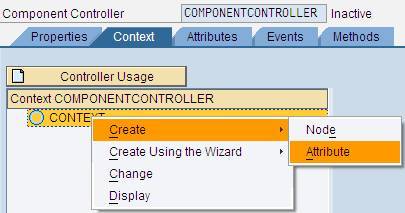
To do this go to the context tab of the COMPONENTCONTROLLER and right click on context, go to create → Attribute.
In the subsequent screen enter the values as shown below
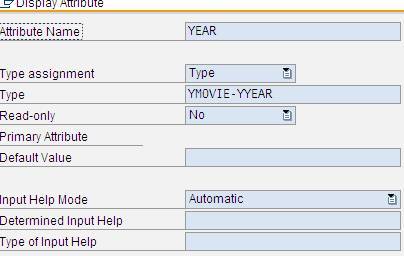
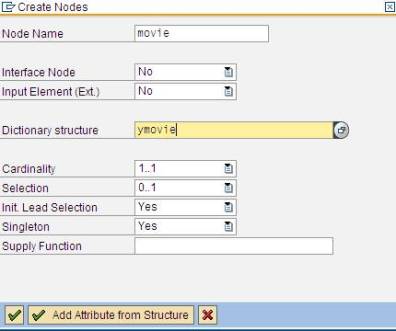
Similarly create attribute for category field. And for the table we need to create a node instead of attribute as table contains multiple fields.
For the table node “movie” enter the YMOVIE in the Dictionary structure field and click on “add attribute from the structure”.
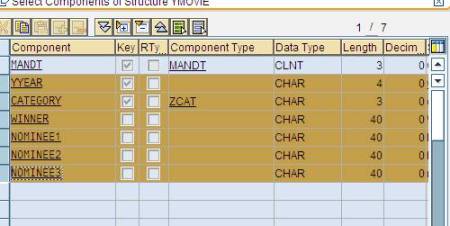
Select the required fields and click on continue.
The context of the COMPONENTCONTROLLER now looks as shown below
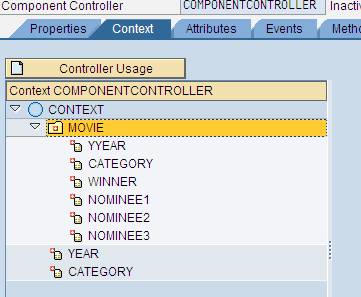
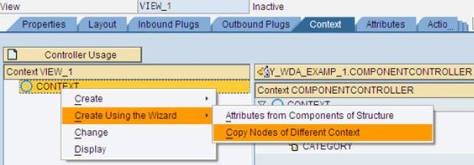
Now as we built the context we need to link this attributes and nodes to the corresponding layout elements. Before this we need to copy this context to the view context. To do this click on the view “VIEW1” and go to the “context” tab. Right click on the context and select “copy nodes of different context”.
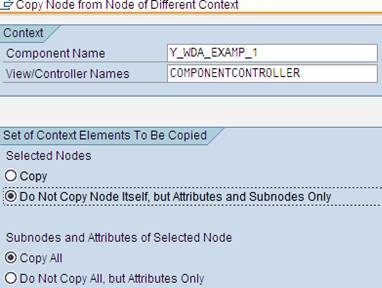
In the next screen , in the field “view/controller names” enter the “COMPONENTCONTROLLER” ( you can do it by hitting F4 button also ) and select the radio button “Do not copy node itself, but attributes and sub nodes only”. Select the context in the next screen and select continue.
The view context after copying the nodes from the COMPONENTCONTROLLER looks like this
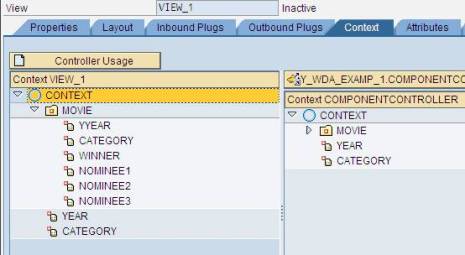
Now as we built the context of the view it is time to link the context elements with the layout elements.
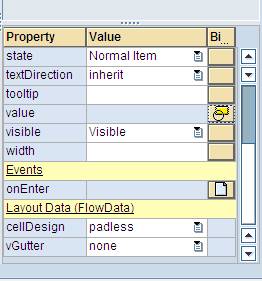
In the property panel of the I/O field YEAR_I, there is a row with the name “value” and beside that you will find the button  for binding the field with the context element.
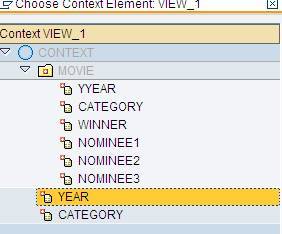
When you click on the binding button a new window opens where all the context elements are listed. For our program purpose we will choose YEAR. Similarly for CATEGORY_I fields we choose category, for table element we choose the node MOVIE.
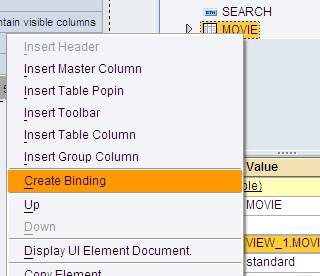
In case of table we need to further binding between the attributes of the MOVIE node and the columns of the table. To do this right click on MOVIE table element and select “create binding”.
In the next screen select the “InputField” in the “cell editor of table column” dropdown and “value” in the ‘name of property to be found” dropdown.
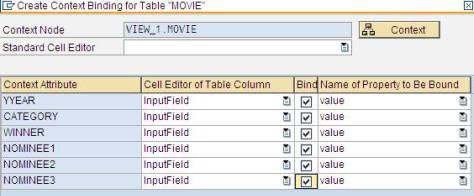
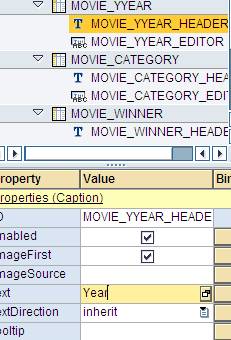
After finishing the binding the message “table does not contain visible columns” disappears from the table elements. If you expand the table node you will find different columns and captions created automatically. Select the captions for each column and enter the description in the “text” row.
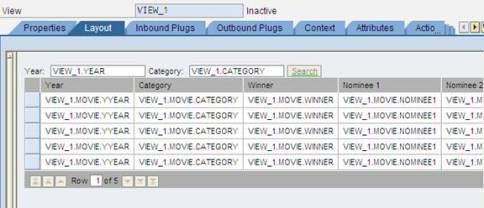
The layout now appears something like this:
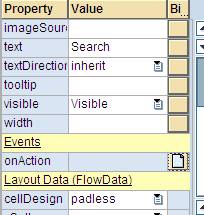
As we completed the binding part we will move onto building the application logic for extracting the data from the YMOVIE table based on the selection criteria given. In order to do that we need to assign an eventhandler method to the button SEARCH. Click on the button  to create an eventhandler method.
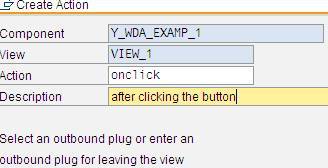
Enter the name for action and description to create the evenhandler method.
Now double click on the “ONCLICK” action in the property panel of the button to enter the ABAP editor of the method “ONACTIONONCLICK” ( the system automatically adds ONACTION before the name of the action given by the user ).
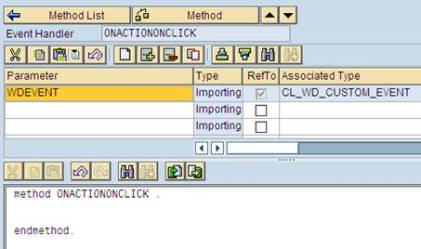
In order to fetch the records from the table YMOVIE we need to retrieve the values entered in the fields’ year and category. The code for this can be generated automatically by the system using “Web dynpro code Wizard”  (at the top of the screen). The code wizard can be used for several purposes like getting the value from a node or attribute, to call methods etc. In our case we will use this for extracting the values from the attributes year and category.
In the wizard window select “read context” radio button and using F4 button select YEAR. Do similarly for category. When we use the code wizard for category attribute some data declaration code generated is redundant ( declarations of Elem_Context and Stru_Context ). So, we need to comment them in order to pass the syntax check.
The variables Item_Category and Item_year are used to store the values extracted from the context attributes YEAR and CATEGORY.
In order to access the data from the YMOVIE table we will write a select statement as shown below:
select * from ymovie into corresponding fields of table itab_movie
where yyear = Item_year
and category = Item_Category.
Itab_movie is an internal table of type movie_data, where movie_data is a custom defined structure.
types: begin of movie_data,
yyear type ymovie-yyear,
category type ymovie-category,
winner type ymovie-winner,
nominee1 type ymovie-nominee1,
nominee2 type ymovie-nominee2,
nominee3 type ymovie-nominee3,
end of movie_data.
After getting the values into internal table itab_movie we need to pass these values to the context node MOVIE in order to display it in the browser. We achieve this in two steps
- – Use GET_CHILD_NODE method of the attribute WD_CONTEXT to instantiate MOVIE node. We store this reference in TABLE_NODE variable.
- – Using the BIND_ELEMENTS method we bind the internal table “itab_movie” with the context node MOVIE.
The code which dos the above said two steps is:
TABLE_NODE = WD_CONTEXT->GET_CHILD_NODE( 'MOVIE' ).
TABLE_NODE->BIND_ELEMENTS( itab_movie ).
Save the code and activate the whole component. The view VIEW1 must be embedded into the window MAIN. Right click on the window and select “Embed View”.
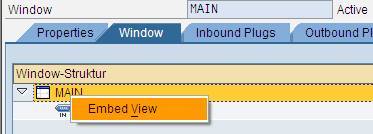
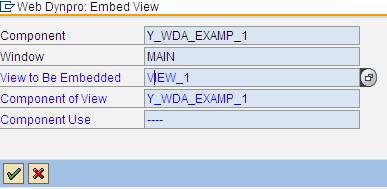
Enter view VIEW1 in the next window by using F4. Save and activate the window.
The final step it to create a web dynpro application for accessing this component through web. This is something similar to the creation of transaction for a module pool program in classical ABAP. To create a web dynpro application right click on webdynpro component create → web dynpro application. Enter the description and continue.

In the properties tab of the web dynpro application a URL is automatically generated by the system. This URL is used to access the webdynpro application from the web.
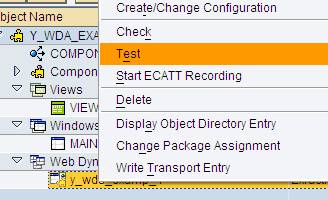
To run the application either paste the URL in the IE or right click on web dynpro application and select test. This will open the application in a browser.
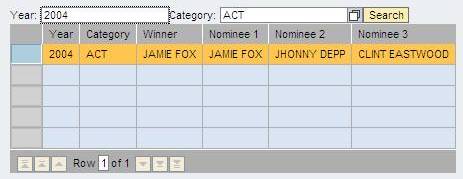
The result as it appears in the IE is shown below.
The complete code snippet of the method ONACTIONONCLICK is given below:
method ONACTIONCLICK .
types: begin of movie_data,
yyear type ymovie-yyear,
category type ymovie-category,
winner type ymovie-winner,
nominee1 type ymovie-nominee1,
nominee2 type ymovie-nominee2,
nominee3 type ymovie-nominee3,
end of movie_data.
data: itab_movie type table of movie_data.
/* Begin of the code generated by Webdynpro code Wizard */
data:
Elem_Context type ref to If_Wd_Context_Element,
Stru_Context type Wd_This->Element_Context ,
Item_CATEGORY like Stru_Context-CATEGORY.
* get element via lead selection
Elem_Context = wd_Context->get_Element( ).
* get single attribute
Elem_Context->get_Attribute(
exporting
Name = `CATEGORY`
importing
Value = Item_Category ).
data:
* Elem_Context type ref to If_Wd_Context_Element,
* Stru_Context type Wd_This->Element_Context ,
TABLE_NODE type ref to IF_WD_CONTEXT_NODE,
Item_YEAR like Stru_Context-YEAR.
* get element via lead selection
Elem_Context = wd_Context->get_Element( ).
* get single attribute
Elem_Context->get_Attribute(
exporting
Name = `YEAR`
importing
Value = Item_Year ).
/* End of the code generated by Webdynpro code Wizard */
select * from ymovie into corresponding fields of table itab_movie
where yyear = Item_Year
and category = Item_Category.
TABLE_NODE = WD_CONTEXT->GET_CHILD_NODE( 'MOVIE' ).
TABLE_NODE->BIND_ELEMENTS( itab_movie ).
endmethod.
Note: The complete documentation on Web Dynpro for ABAP can be found at online SAP help.
Sankar Rao Bhatta is an SAP NetWeaver Consultant with Intel, India. After completing M.Tech from IIT Bombay, he worked with IBM as SAP Consultant before joining Intel. Other areas of his expertise include SAP SRM and ABAP.