In the first two parts of this series, I explained how to create a simple Web Service in XI (Part I) and then consume it using Web Dynpro (Part II). In this section, I will focus on how to design the user interface for the Web Application we created in Part II and provide some additional tips. I shall describe some of the steps from Part II in detail. The article is intended to help XI developers in designing Web Dynpro UI elements.
Before proceeding further, you should have completed the following:
- Generated a WSDL file from XI Integration Directory (See Part I)
- Created a Web Dynpro Project in NWDS (See Part II)
- Created Web Service Model by importing the above WSDL file (See Part II)
- Created a Web Dynpro Component with a default view (StartView) (See Part II)
- Added the Web Service Model to the Component (See Part II)
- Defined Model Binding (See Part II)
Create Views
I assume that you have created only one view (say StartView, which got created when you created your Web Dynpro Component). When you supply the name of the view while creating a Web Dynpro Component, the view gets created and it also gets embedded into the specified window. You can see the view under the Web Dynpro -> Web Dynpro Components -> [Your Component name] -> Views as well as Web Dynpro -> Web Dynpro Components -> [Your Component name] -> Windows -> [Your Window name] node of your project.
Let us add one more view (say ResultView), which will display the details requested by the user.
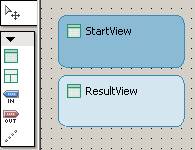
Expand the node Web Dynpro -> Web Dynpro Components -> [Your Component name] -> Views and right click to Create View. Name the view as ResultView. Now right click the node corresponding to window and choose to Embed View. Choose to Embed existing View, then select the view ResultView on next screen and choose Finish. Now double-click the window name. Two views should appear as shown below:
Define Navigation Schema
We have to create fireplugs so that we can navigate from one view to another on occurrence of a specific event.
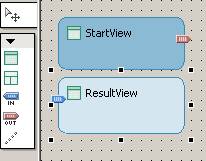
1. Right-click StartView and choose Create Outbound Plug. In the wizard, enter a name say ToResultView and choose Finish.
2. Right-click ResultView and choose Create Inbound Plug. In the wizard, enter a name say FromStartView and choose Finish.
3. Repeat these steps to create two more plugs (Fireplugs) say ToStartView and FromResultView appropriately.
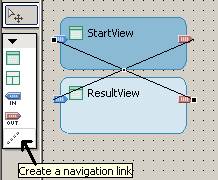
4. Now create links from one view to another. To do this, select the icon Create a navigation link from the left hand side palette and draw a line from outbound plug of one view to inbound plug of the other. Result is shown below:
Note: After you create the views, you should define Context Mapping as discussed in Part II of this article series so as to make the classes/methods of web service model and component controller available for use in the particular view.
Create Actions to Implement Navigation
Here we define which event should trigger the fireplug so as to navigate from one view to another.
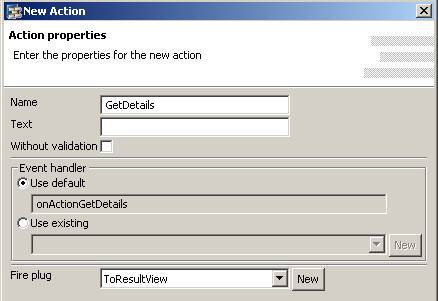
1. Double-click the StartView node in the project hierarchy on the left hand side. Choose the Actions tab on the view designer. Choose the New pushbutton.
2. In the wizard, enter a name for the action say, GetDetails. Leave the Event handler option unchanged. Choose the plug ToResultView as a Fire plug and click Next and then Finish.
3. Repeat the above steps to create a Back action for the ResultView. Assign the ToStartView as Fire plug.
4. Save the objects.
The source code for the event handlers gets generated automatically. To check the generated code, choose the Implementation tab for say StartView. On the Outline view, double-click on the method say onActionGetDetails.
This code calls the outbound plug method wdFirePlugToResultView(). wdThis is a predefined variable, which is used to make method calls to the view controller. Similarly, you can check the code for the Back action event handler.
We have to modify the code for GetDetails Action event handler so that it executes the controller method which actually communicates with XI. Go to Implementation tab for StartView and modify the onActionGetDetails() method as shown below:
public void onActionGetDetails( com.sap.tc.webdynpro.progmodel.api.IWDCustomEvent wdEvent)
{
wdThis.wdGetXIWebServiceComponentController()
.executeRequest_CDWS_MI_CDWS_MI();
wdThis.wdFirePlugToResultView();
}
We have to assign these actions to appropriate buttons on the view layout so that user can trigger them.
Design View Layouts
A. Layout for StartView:
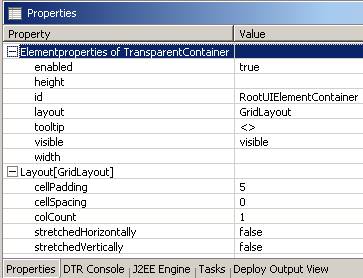
Open the Layout tab in the view designer for StartView. The Outline view displays the UI elements included. Choose the RootUIElementContainer and assign following properties:
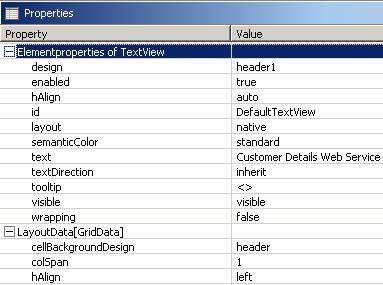
Choose DefaultTextView and assign following properties:
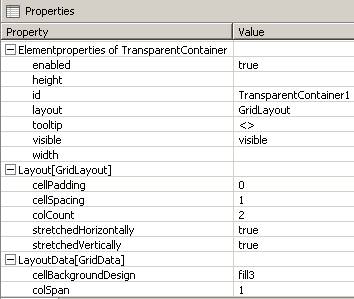
Right-click RootUIElementContainer and choose Insert Child. Select an element of type TransaparentContainer and choose Finish. Assign it following properties:
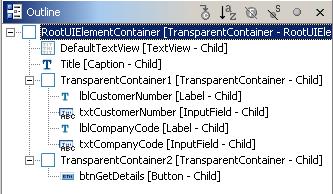
In the same way, create two labels and two InputFields under the TransaparentContainer. Add another TransaparentContainer to hold a button. The completed Outline view is shown below:
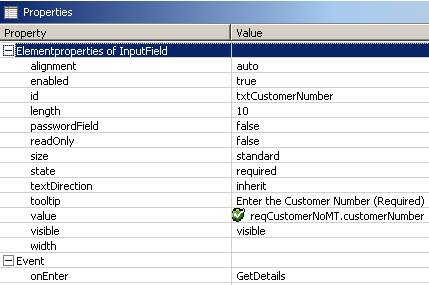
Important properties for labels are labelFor (which is the id of corresponding InputField) and text (which is the displayed text). Important properties for InputFields are value and Event->onEnter. You can change the state property to required to indicate a mandatory field as shown below:
Setting the state property to required only indicates that the field is mandatory, but does not validate the same. You must add your own code to validate the entries. I have discussed this in the last section (Additional Tips) of this part.
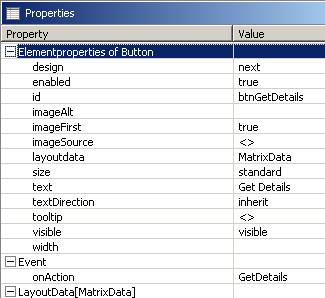
Properties for button are shown below:
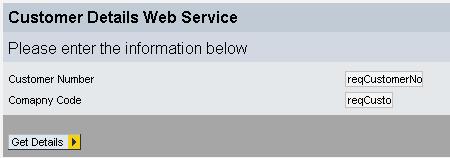
Finally the layout tab should display something like shown below:
B. Layout for ResultView:
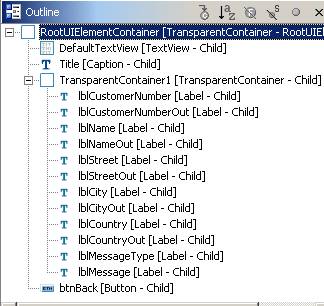
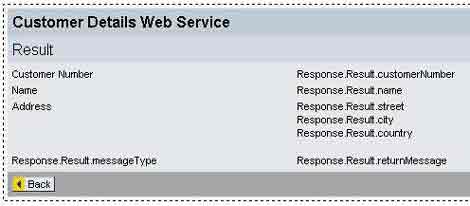
Similarly, design the UI for ResultView. I have shown the final Outline view and the layout below:
Now you can build and run the application as discussed in Part II.
Additional Tips:
1. To make the values of fields, which are deep rooted in the model hierarchy, directly available for use, you can define model attributes for those fields (on the Context tab of your view designer). Once you define the model attribute, methods to get and set the values of these fields get automatically generated. Similarly, to access entire or part of structures from the model, you may define Model Nodes.
For example: Let us add validations so as to make Customer Number field mandatory.
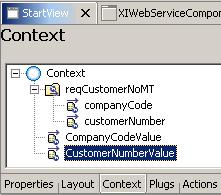
To add a Model Attribute, go to the Context tab of the view designer, right-click the Context node and choose New. Now choose Model Attribute.
I have added a Model attribute called CustomerNumberValue as shown below:
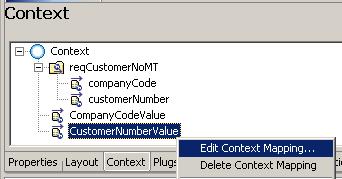
Once you have created the model attribute, right click it and choose Edit Context Mapping…
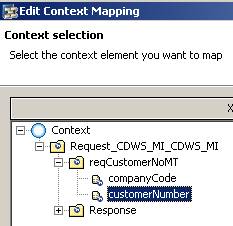
Choose the customerNumber field from the model hierarchy and click Finish.
Now you can use the methods of wdContext (a predefined variable) to validate the Customer Number. You have to modify the appropriate Action method. An example is shown below:
public void onActionGetDetails( com.sap.tc.webdynpro.progmodel.api.IWDCustomEvent wdEvent)
{
if (wdContext.currentContextElement()
.getCustomerNumberValue() == null)
{
//Display an Error message: "Customer Number field is mandatory!"
wdComponentAPI.getMessageManager().reportMessage
(IMessageXIWebServiceComponent.EMPTY,null,true);
}
else
{
wdThis.wdGetXIWebServiceComponentController()
.executeRequest_CDWS_MI_CDWS_MI();
wdThis.wdFirePlugToResultView();
}
}
To display custom messages as in the code above, you need to add a message to the Message Pool in the project hierarchy and activate the same. To know more follow this link: Creating a User Message.
2. Various tutorials on Web Dynpro are available here.
3. An additional example to try out a Web Services Scenario is available at SAP Service Marketplace at this link.
I hope that this article will be helpful to at least those who are not very familiar with Web Dynpro.
