One can transport SAP XI objects either by using File System Transports (Export/Import way) or by using the CMS (Change Management Service). Many a times, File system transport is preferred over CMS. However, transporting via CMS is the recommended way as it helps you to carry out transports in a more organized manner allowing you to keep track of transports, thus ensuring proper traceability. In this article series, we will understand how to carry out SAP XI transports using CMS.
- Part I: Transporting SLD Objects
- Part II: Transporting SAP XI Integration Repository Objects
- Part III: Transporting SAP XI Integration Directory Objects
Ensure that the following steps have been completed before proceeding:
- Install CMS Components for XI on the SAP XI J2EE Server
- Create all relevant service users with proper roles and authorizations
- Maintain CMS related parameters for IR and ID in the Exchange Profile
- Define Business system groups in the SLD as per the landscape
- Maintain the Transport targets in the SLD
- Create a transport domain in the CMS Landscape Configurator and maintain LSADMIN user for the same
- Create tracks for IR and ID objects
Now let us understand how to transport SLD objects.
Transporting Products
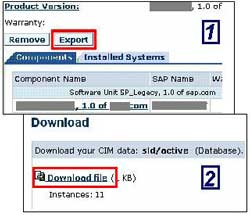
 In the SLD of the source system, choose ‘Software Catalog’
- Navigate to the Product version you wish to transport
- Click on ‘Export’
- Download the presented ZIP file on your local desktop
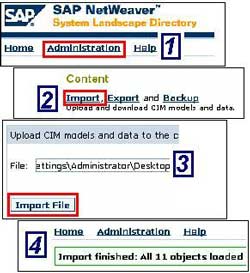
- Now, logon to SLD of the target system
- Click on ‘Administration’ and then click on ‘Import’
- Specify the path of the ZIP file downloaded from source SLD.
- Import the file using the ‘Import File’ button
- A success message will be displayed
- Verify that the Product is indeed available in the target SLD
Transporting Technical Systems
 In the SLD of the source system, choose ‘Technical Landscape’
- Select the Technical System you wish to transport
- Click on ‘Export’
- Download the presented ZIP file on your local desktop
- Now, logon to SLD of the target system
- Click on ‘Administration’ and then click on ‘Import’
- Specify the path of the ZIP file downloaded from source SLD.
- Import the file using the ‘Import File’ button
- A success message will be displayed
- Verify that the Technical system is indeed available in the target SLD
Transporting Business Systems
Business systems are transported in the same way as products and technical systems. However, one point should be noted: You must assign Business System Groups and Transport Targets for every business system you wish to transport.
Let’s say, BS_DEV is a business system in SAP XI development system. All ID objects that use BS_DEV, after transport to SAP XI production system should have the business system BS_PRD instead of BS_DEV.
For the above case, BS_DEV should be defined in SAP XI development system as follows
- Related Integration Server – DVX (SAP XI Dev Server)
- Group – DEV
- Transport Target – Group: PRD Target: BS_PRD
BS_PRD should be defined in SAP XI development system as follows
- Related Integration Server – PRX (SAP XI Production Server)
- Group – PRD
- Transport Source – Group: DEV Source: BS_DEV
To transport a business system
- In the SLD of the source system, choose ‘Business Landscape’
- Select the Business System you wish to transport
- Click on ‘Export’
- Download the presented ZIP file on your local desktop
- Now, logon to SLD of the target system
- Click on ‘Administration’ and then click on ‘Import’
- Specify the path of the zip file downloaded from source SLD.
- Import the file using the ‘Import File’ button
- A success message will be displayed
- Verify that the Business system is indeed available in the target SLD
 Synchronizing the CMS Data with SLD
CMS should be updated whenever a product/software component is created/updated in the SLD.
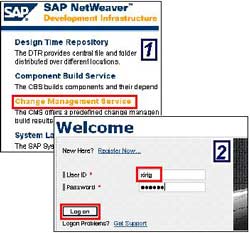
- Access the CMS using the URL
http://<hostname>:<J2EE Port>/devinf - Choose ‘Change Management Service’
- Logon using the XIRIG user
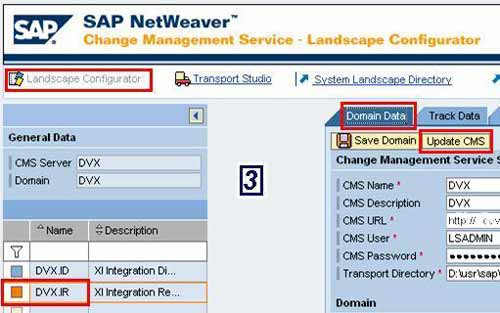
- Go to Landscape Configurator
- Select the IR track on the left
- Go to ‘Domain Data’ tab on the right
- Click on the ‘Update CMS’ button
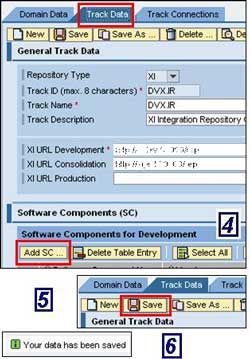 Once done, go to ‘Track Data’ tab
- Add your software component to the track using the ‘Add SC…’ button
- Choose ‘Save’
- Status message will be displayed at the bottom of the page
Thus, we are done with the SLD part. Some points should be noted though –
- During transports, it is suggested to use XISUPER user id in both source and target SLDs
- In CMS, always use user id XIRIG
- Whenever a product or software component is added/updated in source SLD, do not Forget to ‘Update CMS’
- Assign correct Business System Group to every business system and maintain ‘Transport Targets’ to source business systems
In the next part, we will see how to transport Integration Repository objects using CMS.