 Google Docs provides Mail Merge functionality that you can use to send personalized emails via Gmail.
If you are hosting a wedding or a party, you might want to send out invitations to a big list of friends. You could send one email with everyone in bcc. Instead, if you email your friends by greeting them by their first name, they are going to feel valued. And they would be more willing to accept your invite.
However, sending each email individually looks cumbersome, unless you have heard about mail merge. With mail merge, you can do this task in no time and without much effort.
Businesses could use mail merge to send emails to their customers individually for example. The email might include coupon codes or software license keys which would differ for every recipient.
How to Mail Merge with Gmail Using Google Docs
You can use the steps described here with Gmail or Google Apps email. So let’s get started:
 Log in to Gmail. Open this spreadsheet and create a copy using File -> Make a Copy. [via lifehacker].
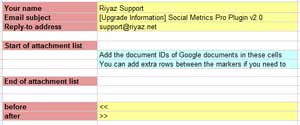
- In the first Worksheet specify the details like your name, email subject, reply-to email, attachment list etc. Make sure you don’t change the any of the cells with red background.
- In case you wish to add attachments, upload the document to be attached to Google Docs. Open the document in Google docs and note the document ID. You will find this ID in the URL displayed in the browser. e.g. see the one highlighted below:
https://docs.google.com/Doc?docid=0AUG8pFpqzKFuZCQ1entyZ2tfOWU1bXNzdw&hl=en_US
 Switch to the third worksheet. Here you can store the details of fields to be personalized e.g. First name, email, coupons etc.
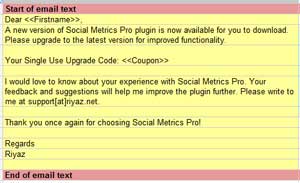
- Now switch to the second worksheet. Write your email message here.
 Whenever you want to insert a field from third worksheet type in the corresponding column name enclosed in << and >>.
- Once you are done writing your email with personalized fields, choose Mail Merge ->Test Mail Merge. You will be prompted to authorize the script the first time you use it. This will show you first three emails. Verify if everything looks good.
- Now to send out the emails, choose Mail Merge ->Run Mail Merge and you’re done!
 That’s how easy it is to send mass personalized emails using Gmail. Once the send process is completed, you will see the status on the third worksheet.
While using this, please bear in mind that Gmail has a maximum limit of 500 emails per day. This means you can send only 500 emails in a day including those you send using mail merge.
Currently, the above spreadsheet does not allow you to use HTML formatting. If you would like to use HTML formatted emails, you can consider using this tutorial and template provided therein to send personalized emails with Gmail and Google Docs.
Related: How to Send Mass Personalized Emails with Microsoft Office Mail Merge
How to Send Mass Personalized Emails with Gmail is a post from riyaz.net.
riyaz.net provides tech tips and tutorials for SAP Professionals and Bloggers (about).
Follow riyaz.net on Twitter, become a fan on Facebook and subscribe to get free email updates.