Managing disk partition optimally can help you improve performance od disk partitions and a system as a whole. It can help you manage data on your disk partitions and de-clutter it easily. You can shrink, extend, create a new partition, delete or format a partition using a built-in Disk Management tool on Windows system. It offers you all basic features to perform disk management function seamlessly. You can use this tool for improved system performance. Let’s discuss ways to manage disk partitions in Windows 10 system.
Manage disk partition using built-in disk management tool
Most of the users on Windows systems face the problem of low disk space especially for the system partition. If you are facing such issue, then you can consider dealing with it using built-in Disk Management tool. This built-in feature works efficiently equal to third-party disk partition software tools. It will help you manage disk partition in a better way so that you should not run out of space on any disk. To use this tool, first, you need to launch Disk Management tool. To do this, you can follow these three steps.
- This is the easiest way to launch Disk Management in Windows 10. To do this, right-click on the Start menu (or press Windows + X hotkeys) and select “Disk Management”.
- Next is to press Windows + R hotkeys to open Run window. Now type “diskmgmt.msc” in the search bar and press OK to open the “Disk Management” tool.
- Alternatively, you can go to Start menu and directly search the “Disk Management” in the search box and select “Create and format hard disk partitions” option from given results.
Accessing Disk Management
Under Disk Management window you will see that it is divided into two panes. The upper pane displays you a list of partitions referred to as volumes. The bottom pane displays a graphical representation of storage devices.
Shrink a partition
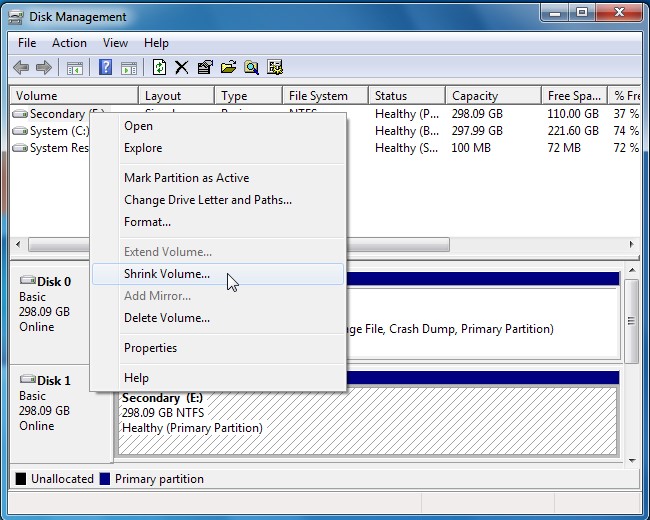
To shrink a partition, go to Disk Management screen and right-click on the partition that you want to shrink and select “Shrink Volume” option from the menu. Here, you need to mention the value you want to shrink your disk by not the new size. For example, if you want to shrink disk partition of 50Gb by roughly 10Gb then you will need to mention 10,000 (in MBs) in the value box. It will shrink your disk partition to 40GB.
 Source: howtogeek
Extend a partition
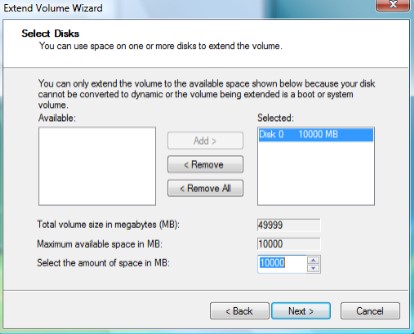
If you want to extend a partition then go to Disk Management screen and right-click on the partition you wish to extend and select “Extend Volume” option from the menu. Here, on Extend Volume Wizard you can mention the amount that you wish to increase the partition by. Following the above-mentioned example if you wish to extend disk partition from 40 Gb to 50Gb again then you need to mention 10,000 (in MBs) in the value box. It will increase your disk partition to 50GB again.
 Source: howtogeek
Note: The extend partition feature works only with contiguous space.
Creating a partition
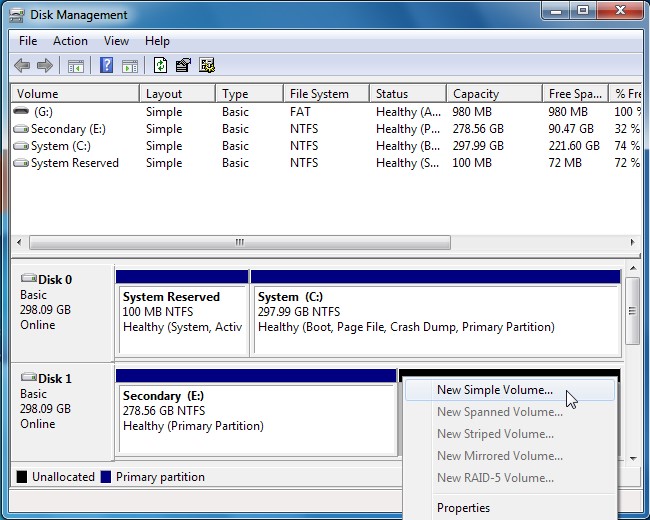
When you have shrunk a partition, you will get an additional free space to create another partition on your system. To do this, right-click within the unallocated space and choose “New Simple volume” option. It will open a “New Simple Volume” wizard, which will guide you through the setting a size for the new partition, assigning a drive letter and formatting it with a file system.
 Source: howtogeek
Deleting a partition
If you want to delete any partition to recover some storage space or due to other reasons you can do it by simple steps. To do this, just right-click on the partition you want to delete and select “Delete Volume” option to delete a partition and free up space. It will simply delete all files on the partition so be careful while using this feature.
Changing Drive Letters
You can use this option to change drive letters. To do this, right-click on a partition you wish to change drive letters of and select “Change Drive Letter and Paths” option to change its drive letter. Click the Change button to choose a new drive letter. You can also use this dialog to assign a permanent drive letter to a removable drive. It can also help you remove a partition’s drive letter and hide it.
Format a partition
If you want to format a partition just right-click on the partition you want to format and select “Format” option in the Windows Explorer. You can also format a partition by right-clicking on it and formatting it with a new file system and erase its content. It will clean all data on the partition.
You can follow these various steps to manage disk partition well. Following these steps, you can perform all tasks to manage your disk partition easily. In fact, it will help you improve your system performance instantly.
Summary
By managing disk partition on your Windows 10 system you can improve system performance seamlessly. Let’s discuss ways to manage disk partition on Windows 10 system.